Adding a Simple Cookie Consent Banner in Microsoft Power Pages
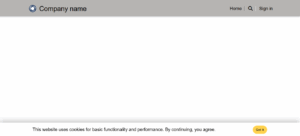
By default, Microsoft Power Pages uses cookies for essential functionality, but it does not include a built-in cookie consent popup. If you want to notify visitors in a simple and user-friendly way, you can easily add your own banner with just a few lines of code. In this post, I’ll show you how to create a lightweight cookie consent banner with a “Got it” button. No preferences or complex configuration needed — just a clean notice that disappears once the user accepts. Why You Need This Transparency: Inform users about cookie usage. Compliance: Many regions require at least a basic notice. User Experience: A non-intrusive banner that goes away after acceptance. Step 1 – Create Content Snippets First, we’ll store the banner text in content snippets so editors can update wording later without touching code — even in multilingual setups: In Power Pages Studio, open the … (More) menu and select Power Pages Management app. In the Power Pages Management app, navigate to Content → Content Snippets. Click New to Create a new content snippet: Name: Cookie/ConsentText Website: <Your Site> Display Name: Cookie/ConsentText Type: Text Content Snippet Language: Select your default language Value:This website uses cookies for basic functionality and performance. By continuing, you agree. Repeat step 3 to create extra snippets for different laguages, keep the name the same: Cookie/ConsentText 💡(Optional but recommended) Create a second content snippet for the button label: Name: Cookie/ConsentButton Value: Got it Step 2 – Create the “Cookie Consent” Web Template Next, we’ll add the banner markup, styling, and script to a dedicated Web Template. In the Power Pages Management app, go to Web Templates → New. Set the Name to Cookie Consent. Set the language to your default language Paste in this code in Source <div id=”pp-consent” class=”pp-consent hidden” role=”region” aria-label=”Cookie notice”> <div class=”pp-consent__content”> <p class=”pp-consent__text”> {{ snippets[’Cookie/ConsentText’] | default: ‘This website uses cookies for basic functionality and performance. By continuing, you agree.’ }} </p> <button id=”pp-consent-accept” class=”pp-consent__btn” type=”button” aria-label=”{{ snippets[’Cookie/ConsentButton’] | default: ‘Got it’ }}”> {{ snippets[’Cookie/ConsentButton’] | default: ‘Got it’ }} </button> </div> </div> <style> .pp-consent { position: fixed; inset-inline: 0; bottom: 0; z-index: 9999; background: rgba(20,20,20,.95); color: #fff; font: 14px/1.45 system-ui, -apple-system, Segoe UI, Roboto, Arial, sans-serif; box-shadow: 0 -6px 24px rgba(0,0,0,.25); } .pp-consent.hidden { display: none; } .pp-consent__content { max-width: 1080px; margin: 0 auto; padding: 14px 16px; display: flex; gap: 12px; align-items: center; justify-content: space-between; flex-wrap: wrap; } .pp-consent__text { margin: 0; } .pp-consent__btn { border: 0; padding: 8px 14px; border-radius: 9999px; cursor: pointer; background: #ffd24d; color: #1b1b1b; font-weight: 600; } .pp-consent__btn:focus { outline: 2px solid #fff; outline-offset: 2px; } </style> <script> (function() { var KEY = “pp_cookie_consent_v1”; try { if (localStorage.getItem(KEY) === “accepted”) return; } catch(e) {} var banner = document.getElementById(“pp-consent”); var btn = document.getElementById(“pp-consent-accept”); function hide() { banner.classList.add(“hidden”); } function accept() { try { localStorage.setItem(KEY, “accepted”); } catch(e) {} hide(); } if (banner && btn) { banner.classList.remove(“hidden”); btn.addEventListener(“click”, accept); banner.addEventListener(“keydown”, function(ev){ if (ev.key === “Escape”) hide(); }); } })(); </script> 💡 Optional: If you only want to show the banner to anonymous visitors, wrap the entire block in{% if user == null %} … {% endif %}. Step 3 – Include It in the Footer Web Template Finally, we include the cookie consent template in the site footer. In the Power Pages Management app, open Web Templates → Footer. At the very end, add: {% include ‘Cookie Consent’ %} Save your changes. Step 4 – Publish and Test Save and publish your portal. Open your site in an incognito/private browser window. The banner should appear at the bottom of the page. Click Got it, refresh the page — the banner won’t come back because it’s stored in localStorage. Step 5 – Customize the Look You can easily customize the styling: Adjust colors in the CSS block to match your theme. Replace the button with Bootstrap classes if you prefer: <button id=”pp-consent-accept” class=”btn btn-primary”> {{ snippets[‘Cookie/ConsentButton’] }} </button> Update the wording any time in the Content Snippets — no code changes needed. Conclusion With just one content snippets, a dedicated Web Template, and one line in your Footer, you now have a simple cookie consent banner in Microsoft Power Pages. It’s: Lightweight Language-aware via snippets Easy to edit by content authors Reusable thanks to the Web Template include
Power Platform Fundamentals: Understanding Dataverse

Introduction The Microsoft Power Platform—and its core components Power Apps, Power Automate, Power BI and Power Virtual Agents—gives organisations a way to build custom solutions without writing huge amounts of code. At the heart of these tools sits a unified data technology that acts as the “engine” for storing, securing and connecting information: Dataverse (formerly known as the Common Data Service or CDS). Dataverse provides a single, secure and scalable store for business data. Instead of connecting each app directly to spreadsheets, databases and services individually, organisations can import or synchronise data into Dataverse and then build apps and automations around that unified information. This post explains what Dataverse is, why it matters and how it fits within the Power Platform. What is Dataverse? Dataverse is a cloud‑based data storage service built on Microsoft Azure. It’s designed to act as a central hub for data used across the Power Platform. Information in Dataverse is organised into tables (formerly called entities), which are made up of rows and columns. Microsoft provides a set of standard tables to cover common business concepts such as accounts, contacts and tasks. You can also create custom tables to model the unique aspects of your organisation. Key aspects of Dataverse include: Unified storage – Data from multiple systems can be imported or synchronised into a single, integrated data store. Tables can hold relational data (e.g. accounts and contacts), files, images and even non‑relational data. No‑cliffs scalability – Dataverse was born from the Common Data Service and uses Azure behind the scenes. It scales from small proof‑of‑concept apps to enterprise‑grade solutions without forcing you to migrate to a different platform. Azure foundation – Because it’s hosted in Azure, Dataverse benefits from the platform’s security, compliance, scalability and global availability. Rich metadata – Tables include data types, relationships, formulas and business rules. These definitions are consumed automatically by Power Apps, Power Automate, Power BI and Copilot Studio. Extensibility – Developers can interact with Dataverse using REST and SDK APIs, create plug‑ins to extend logic or build custom connectors. In late 2020 Microsoft renamed the Common Data Service to Dataverse. Although you may still see CDS referenced in older content and connectors, it’s the same service under the hood—Dataverse is simply the current name. Why Dataverse Matters: Benefits Dataverse does more than simply hold data. It offers capabilities that reduce development effort, improve data quality and ensure that your information is secure. Some of the key benefits include: Easy to manage – Data and metadata are stored in the cloud. Administrators do not need to worry about server maintenance, storage provisioning or backups; these are handled automatically. Built‑in security – Dataverse uses Microsoft Entra identity management and supports role‑based, row‑level and column‑level security. You can grant or restrict access at a granular level and even implement hierarchical permissions for managers and teams. Integration with Dynamics 365 – Many Dynamics 365 apps (Sales, Customer Service, etc.) use Dataverse as their data store. This means Power Apps can use your existing business data without extra integration work. Logic and validation – You can define business rules, calculated columns, workflows and business process flows directly on tables to ensure data consistency across all your apps. Productivity tools – Tables can be opened and edited in Excel, Power Query, Power BI and other familiar tools, making it easy to interact with your data. Support for any data type – Dataverse can hold relational data, files, images, search data and even external data via virtual tables that surface information from another system without copying it. The Role of Dataverse in the Power Platform Building with Power Apps Power Apps gives makers two primary ways to create applications: Canvas apps – Offer complete control over the user interface. Makers can connect to Dataverse (or other connectors) to read and write data. For simple apps you can use connectors directly; for more complex scenarios, storing the data in Dataverse simplifies security, relationships and offline access. Model‑driven apps – Always use Dataverse. Once you define your tables, relationships and forms, Power Apps automatically generates a responsive user interface based on the data model. This is ideal for structured applications such as CRM, case management or service desk solutions. Because Dataverse understands your data structure, Power Apps can automatically generate forms, views and dashboards. This accelerates development and ensures consistency across different apps that use the same tables. Automating with Power Automate Power Automate enables you to build workflows that respond to events (such as a new row being created) or perform scheduled tasks. When Dataverse is the data source, you can: Trigger flows when data changes—create, update or delete events on tables can start a flow without polling. Perform actions against Dataverse—create or modify rows, query data using filters, or call custom APIs. Combine Dataverse data with hundreds of connectors—use information from your unified data store to orchestrate processes that span Office 365, third‑party SaaS services and on‑premises systems. Analysing with Power BI Power BI can connect directly to Dataverse to create interactive dashboards and reports. Because Dataverse stores rich metadata—including relationships and choice columns—Power BI automatically understands how the tables relate. For deeper analytics and machine‑learning scenarios, data can be exported to Azure Data Lake where services like Synapse Analytics provide advanced processing and AI models. Conversational experiences with Copilot Studio and Power Virtual Agents Dataverse acts as the brain for conversational bots built with Copilot Studio or Power Virtual Agents. Bots can query, update or create records in Dataverse during a conversation. Makers can also use AI Builder models to analyse images or text stored in Dataverse and use the results in their bots or apps. Dataverse vs. Traditional Databases Dataverse is sometimes compared with traditional relational databases like SQL Server. While both store tables, Dataverse includes several layers of functionality out of the box: Feature categoryDataverse capabilitiesTraditional databasesSecurityManaged identity via Microsoft Entra, role‑based and row/column permissions built inUsually requires custom development and integration of authentication/authorizationLogicBusiness rules, calculated columns, workflows and process flows at the data levelRequires stored procedures, triggers or additional servicesIntegrationNative connectors to Microsoft 365, Dynamics 365, Azure and hundreds of services; virtual tables surface external data in real timeOften reliant on ETL processes or custom integrationStorage & scalabilityHosted in Azure with automatic replication, backups and 99.9 % SLAAdministrators […]
Introduction to Power Automate: Automating Simple Tasks

Introduction to Power Automate Microsoft Power Automate is a cloud‑based service that lets you automate repetitive tasks without writing code. It connects different applications and services so you can build workflows that trigger when something happens and then perform one or more actions. Automating manual processes frees up time, reduces errors and allows you to focus on more important work. How Power Automate Works: Triggers and Actions Each workflow, called a flow, is built around triggers and actions. A trigger is an event that starts the flow, such as receiving an email or adding an item to a SharePoint list. Once triggered, the flow performs a series of actions—for example, sending a notification, copying a file or creating a task. One flow can contain multiple actions, and there are various types of flows (automated, instant and scheduled) depending on how and when you need them to run. Why Use Power Automate for Simple Tasks? Save time: Automate routine tasks like sending notifications or copying attachments so you can work on more valuable activities. Improve efficiency: Flows connect different applications seamlessly, reducing manual intervention and minimizing mistakes. Flexible and scalable: With hundreds of connectors and a visual interface, Power Automate works for both simple and complex processes. Examples of Basic Workflows 1. Email Notifications You can create a simple flow that automatically sends emails based on a specific trigger. For instance, when a new item is added to a list or a form is submitted, Power Automate can send a customized email to the relevant people. A basic email‑notification flow typically includes: Trigger: Define the event that starts the flow (e.g., “When a new email arrives”). Action: Use the “Send an email” action to specify recipients, subject and message body. You can personalize the email with data from the trigger or other actions. Flows can also be set up to send multiple emails at once by storing addresses in a variable or data source and looping through them. This is useful for newsletters, order confirmations or any scenario where a standard message is sent to many recipients. 2. File Storage Automation Another common task is automatically saving attachments or files to cloud storage. Power Automate can detect incoming messages with attachments and store them in SharePoint, OneDrive for Business or other services. Here’s how a basic file‑storage flow works: Trigger: Use “When a new email arrives” and limit it to messages that include attachments. Action: Add an “Apply to each” loop that processes each attachment. Create File: For each attachment, use a “Create file” action in SharePoint or OneDrive. Set the file name and content to the attachment’s name and bytes. (Optional) Update Metadata: You can add steps to tag the file with the email subject, sender or date for easier tracking. This automation ensures that important documents are stored in the right location without manual downloads or uploads. Conclusion Power Automate is a powerful yet approachable tool for automating everyday tasks. By understanding how triggers and actions work, you can build simple flows that handle email notifications, file storage and many other routine processes. These basic workflows serve as a foundation for more complex automations that can streamline operations and improve productivity across your organization.
Getting Started with Power Apps: Building Your First App

Microsoft Power Apps is a service that empowers everyone—from business users to developers—to create custom applications without writing a lot of code. A canvas app in Power Apps lets you design the user interface by arranging controls and fields on a blank canvas. This guide walks you through creating your first canvas app step by step. Step 1 – Sign in to Power Apps Open your web browser and go to powerapps.microsoft.com. Select Sign in and log in with your Microsoft account. When you’re signed in, you’ll land on the Power Apps home screen. Step 2 – Create a new canvas app From the home screen, choose Create on the left navigation menu. Under Start from blank, select Canvas app. You can also start from a sample or template if you see one that suits your scenario. Enter a name for your app and choose the format (desktop,tablet or phone) based on how users will access it. Click Create to open the canvas designer. Step 3 – Connect to data Canvas apps become powerful when they connect to external data sources such as Excel tables, SharePoint lists or Dataverse tables. In the canvas designer, select Add data from the left‑hand panel. Choose a connector (for example SharePoint, OneDrive for Business, SQL Server or Dataverse). Authenticate if prompted and choose the table or list you want to use. The data source will appear in the data panel for use in galleries, forms and other controls. Step 4 – Build the user interface At this point you have a blank canvas ready for controls. You’ll typically create three screens: a browse screen that lists records, a detail screen that shows a single record and an edit screen for adding or editing data. Add a gallery: On the Insert menu, choose Gallery and select a layout (vertical or horizontal). Set its Items property to your data source (for example Items = ‘[YourDataSource]’). The gallery will display a list of records. Customize the gallery: Select the gallery and use the right‑hand pane to choose which fields appear. You can rearrange fields, change the layout or adjust colours to match your organisation’s style. Add a form: Insert a Form control on a new screen and set its DataSource property to the same data source. Set the form’s Item property to Gallery.Selected so that it shows details for the selected record. Use an EditForm if you want users to edit existing records or a DisplayForm if you want it to be read‑only. Use input controls: Drag labels, text inputs, drop‑down lists and other controls onto your screens. Bind each control’s Default or Text property to the appropriate field in your data source. Step 5 – Add navigation and logic An app becomes truly interactive when it has multiple screens and navigation between them. Create more screens: Use the New screen command to add screens for browsing, viewing and editing data. Navigate between screens: Insert Buttons or Icons and set their OnSelect property using the Navigate() function. For example, Navigate(DetailScreen, ScreenTransition.Fade) opens the detail screen with a fade transition. Add formulas: Power Apps uses a simple Excel‑like formula language. You can set the Visible property of a control to a conditional expression, use If() to branch logic or use Patch() to write changes back to the data source. Step 6 – Test, save and share your app Preview the app: Select the Play button (a triangle icon) in the upper‑right corner of the designer to run your app. Test navigation, data entry and any formulas you’ve added. Save your work: Choose File → Save, select a location (Power Apps uses Dataverse to store apps by default) and save the app. Give it a clear name and description so collaborators know its purpose. Share the app: From File → Share, invite colleagues by entering their email addresses. Assign roles (such as user or co‑owner) and specify whether they can edit the app. Conclusion Building a canvas app in Power Apps is an intuitive process of connecting data, designing screens and adding logic. With just a few steps you can produce a functional business application that runs on the web and mobile devices. Continue experimenting with controls, formulas and data sources to expand your app’s capabilities and tailor it to your specific needs.
What is the Microsoft Power Platform?

The Microsoft Power Platform is a suite of low‑code tools designed to help people across your organization analyze data, build custom apps, automate processes and even publish external websites — all without needing to be a professional developer. By unifying four core products under one umbrella and connecting them through a shared data service called Dataverse, the platform enables you to turn ideas into working solutions quickly. Whether you’re a business analyst looking to visualize data, a line‑of‑business manager wanting to replace manual spreadsheets with an app, or an IT pro trying to streamline approvals, the Power Platform offers an accessible way to modernize and innovate. How the Power Platform works At its heart, the Power Platform is a low‑code platform. This means you can create solutions using intuitive drag‑and‑drop interfaces and natural‑language prompts rather than writing large amounts of code. Professionals and citizen developers alike can collaborate on the same platform to deliver business value faster. The four products that make up the platform are: Power BI – business intelligence and data visualisation. Power Apps – custom application development. Power Automate – workflow and process automation. Power Pages – external web site creation. Each component can be used on its own, but their real strength comes from working together. A dashboard in Power BI can launch a Power App to take action on insights; a form built in Power Pages can trigger a Power Automate flow; and all of them can securely read and write data using Dataverse and 1,000+ connectors. Power BI: turn data into insight Power BI is Microsoft’s unified, scalable business‑intelligence platform. It connects to hundreds of data sources — from spreadsheets and SQL databases to cloud services — and allows users to build interactive dashboards and reports using a drag‑and‑drop interface. Because the platform is designed for self‑service analytics as well as enterprise reporting, you can start with simple charts and evolve into robust data models without changing tools. Key features Unified and scalable: A single platform for both self‑service and enterprise BI. Connect to and visualize data from almost any source and embed those visuals into apps you use every day. Interactive dashboards: Create rich dashboards and reports with filters, drill‑down and natural‑language queries. Users can explore data on the web or mobile devices. Collaboration and sharing: Publish reports securely to the Power BI service and share them with colleagues or embed them into Microsoft Teams, SharePoint, Power Pages or other applications. AI‑powered analytics: Built‑in AI capabilities help spot patterns and anomalies in your data. When combined with Copilot in the Microsoft Fabric analytics platform, even non‑technical users can ask questions and generate visualisations using natural language. Typical use cases Power BI is ideal for executives needing a real‑time view of key performance indicators, finance teams looking to unify data from multiple systems, or business analysts who want to explore data without waiting for IT to build reports. It is also increasingly used in combination with Power Apps and Power Automate — for example, adding action buttons to a report that open a related app or launch an approval workflow. Power Apps: build custom apps without heavy coding Power Apps provides a rapid application‑development environment for building tailored business apps with minimal code. According to Microsoft’s own description, Power Apps is a suite of apps, services and connectors, as well as a data platform, that provides a rapid development environment to build custom apps for your business needs. You can connect to data in Dataverse, Microsoft 365, Dynamics 365, SharePoint or hundreds of other sources and assemble screens and forms using drag‑and‑drop controls. The platform supports three types of apps: canvas apps, model‑driven apps and Power Apps cards (micro‑apps that can be embedded into other services). Key features Drag‑and‑drop design: Create responsive apps by selecting controls such as text inputs, galleries, buttons and forms and positioning them visually on a canvas. Rich business logic and workflow: Apps built with Power Apps include conditional logic, validations and workflow rules to replace manual processes. They can run in browsers and on mobile devices. Extensibility: Pro developers can extend apps with custom connectors, Power Apps component framework controls, Azure Functions or integration with other services. Power Apps also includes AI assistance through Copilot to help design apps and generate formulas. Typical use cases Power Apps is suited for replacing spreadsheets, paper‑based processes or legacy applications with a modern app. Examples include expense‑tracking apps, inspections, customer self‑service portals, order entry forms, or mobile apps for field workers. Because Power Apps uses the same security and data model as Dataverse, it integrates seamlessly with the rest of the Power Platform. Power Automate: streamline workflows and save time Power Automate (formerly Microsoft Flow) helps you automate repetitive tasks and orchestrate business processes across services. It offers an intuitive interface and a library of connectors so you can create workflows without writing code. As Microsoft explains, Power Automate helps you streamline your business processes and automate repetitive tasks. You can drag and drop components and set up workflows to save time and improve efficiency; flows can handle simple tasks like sending notifications or approvals as well as complex processes across multiple apps. Key features Multiple flow types: Build cloud flows that run on a schedule or when specific events occur; desktop flows that automate tasks on a local computer; and AI‑driven generative actions (in preview) that choose the right steps based on your intent. Wide range of connectors: Power Automate supports over a thousand connectors for Microsoft 365, Dynamics 365, SharePoint, SQL, Salesforce and many more, enabling cross‑system workflows. User‑friendly design: Use a visual designer with drag‑and‑drop actions and natural‑language prompting. Templates help you get started quickly. Scalability and governance: Centralized administration, analytics and security controls help IT teams manage automations across the organization. Typical use cases Common scenarios include sending automated alerts when data changes, routing documents for approvals, synchronising files between systems, extracting data from emails, or orchestrating end‑to‑end business processes that involve multiple applications. Power Automate also integrates closely with Power Apps (for triggering workflows from an app) and Power Pages (for responding to form submissions). Power Pages: publish secure, data‑driven websites Although the Power Platform is often associated […]
Installing and Using Microsoft Power Platform Tools in Visual Studio Code

Microsoft’s Power Platform provides low‑code tools like Power Apps, Power Automate, Power BI and Power Pages to build business applications quickly. For developers who prefer working in code editors, Microsoft offers Power Platform Tools for Visual Studio Code (VS Code). This extension packages the Microsoft Power Platform command‑line interface (PAC CLI) and provides a graphical experience for managing Power Pages sites. This guide walks you through installing the tools and using the most common commands. Prerequisites Before installing the Power Platform tools, make sure you meet these prerequisites: Visual Studio Code – Download and install VS Code for your operating system. .NET runtime – On Windows the extension requires the .NET 4.8 runtime and on macOS/Linux the .NET 6.0 SDK marketplace.visualstudio.com. Step 1 – Install the Power Platform Tools extension You can install the extension either from the Visual Studio Marketplace or directly inside VS Code. The Marketplace approach opens VS Code for you, while the in‑editor method keeps you inside the editor. Option A – Install from the Marketplace Open the extension page. Navigate to the Power Platform Tools page on the Visual Studio Marketplace. The page describes the extension and lists requirements. Select Install. On the Marketplace page, select Install If prompted, allow the browser to open VS Code. Approve the prompts in your browser. Your browser may ask to open VS Code; select Open. VS Code will open and display the extension details page. Install in VS Code. In VS Code, choose Install to complete the installation. Option B – Install from within VS Code Open VS Code and select the Extensions icon in the side bar (or press <kbd>Ctrl</kbd>+<kbd>Shift</kbd>+<kbd>X</kbd>). The Extensions view lists installed extensions and provides a search box. Search for “Power Platform Tools.” In the search box, type power platform tools. The Microsoft Power Platform Tools extension will appear in the results. Select Install. Click the Install button on the extension’s tile. VS Code downloads the extension, installs it and displays a completion message. Verifying the installation After installation, the extension makes the PAC CLI available inside the VS Code integrated terminal. To verify that the CLI is available: Open the VS Code Terminal (Terminal → New Terminal). Enter pac and press <kbd>Enter</kbd>. If installed correctly, the CLI prints usage information and lists command groups such as admin, auth, org, package, paportal, pcf, and solution marketplace.visualstudio.com. When new versions are released, the extension automatically updates. You can also install previous versions by selecting Install Another version… from the extension’s drop‑down menu. Step 2 – Basic use of the PAC CLI The Microsoft Power Platform CLI lets you manage environments, solutions and Power Pages sites from the command line. After installing the VS Code extension, you can run pac commands in the integrated terminal. Below are common tasks. Authenticate and manage environments Most CLI commands require authenticated access to Dataverse environments. You create an auth profile using the pac auth create command. The –environment parameter connects directly to a specific environment: pac auth create –environment “MyEnvironment” To see all auth profiles on your machine, use pac auth list. Each profile is assigned an index value. Select a different profile with pac auth select and the index: pac auth list # list auth profilespac auth select –index 2 # switch to profile at index 2 After authenticating, you can display available environments (Dataverse organizations) and select one: pac org list # show all environmentspac org select –environment “EnvName” # set the current environment Listing environments helps you identify the environment name used in subsequent commands. The pac org select command uses the environment’s unique name when there are multiple environments with similar display names. List, export and import solutions Solutions are packages of customizations and components for the Power Platform. Once an environment is selected, list all solutions with: pac solution list # lists all solutions in the current environment:contentReference[oaicite:13]{index=13} To export a solution, specify the path to save the .zip file, the internal solution name and whether it should be managed. For example: pac solution export \ –path C:\\exports\\MySolution.zip \ –name MySolution \ –managed true To import a solution into the current environment, provide the path to the .zip filele: pac solution import –path C:\\exports\\MySolution.zip These commands streamline moving solutions between development and test environments without opening the Power Apps portal. Other useful commands The CLI includes many sub‑commands. Run pac help or pac <subcommand> help to see optionsmarketplace.visualstudio.com. For example, pac solution help displays commands such as init, add-reference, list, import, export and packmarketplace.visualstudio.com. Use pac solution init to create a new Dataverse solution project, and pac solution unpack to extract a solution .zip into source files for version control. Step 3 – Managing Power Pages sites in VS Code When you install the Power Platform Tools extension, a Power Pages Actions pane appears in the Explorer side bar. It lists sites in three categories: Active Sites – currently available and active in the selected environment. Inactive Sites – present in the environment but not active. Other Sites – downloaded locally but not associated with an environment. Right‑click a site to access context‑specific actions: Preview – clears the cache and opens the site inside VS Code using the embedded Microsoft Edge DevTools. You can view changes immediately. Upload – uploads local changes back to your environment. Download – downloads site content to a local folder for offline editing. Site Details – displays information like the website ID, URL and data‑model version. Reveal in Explorer – opens the local directory that contains the site’s code. For inactive or local sites, options include Open Site Management and Upload Site. After uploading a local site, it appears in the inactive list; you can activate it from the Power Pages home page. Step 4 – Editing and IntelliSense features The extension improves the editing experience for Power Pages development: File‑icon theme – VS Code shows icons specific to Power Pages files (web pages, templates, snippets, etc.) when you enable the Power Apps portals file‑icon theme. Enable it via File → Preferences → Theme → File Icon Theme, then select Power Apps portals Icons. In‑editor preview – The Preview action runs an embedded Microsoft Edge browser with device emulation and DevTools. It always reflects the latest uploaded changes. IntelliSense for Liquid tags – When editing templates, the extension provides autocomplete suggestions for Liquid tags and objects. Typing {{ and pressing <kbd>Ctrl</kbd>+<kbd>Space</kbd> displays available objects; typing <CTRL> – space in a {% include %} statement lists template names. This improves accuracy and reduces syntax errors. Context menu actions – You can create, delete or rename website components (pages, […]
7 Essential Power Platform Tips Every Pro Should Know

The Microsoft Power Platform has become a cornerstone in today’s enterprise application landscape. Whether you’re building apps with Power Apps, automating tasks with Power Automate, managing your data in Dataverse, or orchestrating smart flows with Copilot Studio — the possibilities are endless. But how do you truly make the most of it? Here are 7 practical, real-world tips that can make your work easier, faster, and more effective. 1. Use Collections Smartly in Power Apps The Microsoft Power Platform has become an essential part of the modern enterprise application landscape. Whether you’re building apps with Power Apps, automating processes with Power Automate, storing data in Dataverse, or building smart agents with Copilot Studio, the platform offers incredible flexibility. But how do you make the most of it? Here are 7 practical tips that I’ve gathered from real-world projects. ClearCollect(MySelectedContacts, Filter(Contacts, ID in SelectedIDs)); You can use this collection for filtering, displaying, or even bulk updating records efficiently. 2. Avoid Trigger Loops in Power Automate Using Dataverse triggers like When a row is updated? Be careful not to create infinite loops by updating the same record again. Solution: Add a trigger condition or column filter Use a custom flag or timestamp to indicate processed changes 3. Add “Select All” to Combo Boxes Power Apps combo boxes don’t include a native “Select All” option. You can add a toggle button that selects all items: UpdateContext({AllSelected: !AllSelected}); If(AllSelected, UpdateContext({MyComboSelection: Choices(MyTable.MyField)}), Clear(MyComboSelection)) Simple and effective. 4. Working with Web API in Power Pages? Don’t Forget the Anti-Forgery Token When calling the Web API in Power Pages, always include the __RequestVerificationToken in your headers. var token = $(“input[name=’__RequestVerificationToken’]”).val(); Add it to your fetch() or XMLHttpRequest headers to avoid authorization errors. 5. Role-Based Visibility with Power Fx Want to conditionally show or hide fields based on the user’s role? Here’s a basic example: If(User().Email in [”admin@domain.com”, “manager@domain.com”], true, false) For advanced scenarios, you can query Dataverse for role memberships using lookups. 6. Handle Payload Limits in Copilot Studio Copilot Studio has a max payload limit (e.g., 450 KB). If your flows return large JSON or allow file uploads: Add file size validation in Power Automate Use summarization logic before sending large outputs to the agent 7. Pass Context via Record ID to Custom Pages When opening a custom page from a model-driven app, the supported way to pass context is by referencing an existing Dataverse record: Xrm.Navigation.navigateTo({ pageType: “custom”, name: “mypage_name”, entityName: “account”, entityId: “YOUR-GUID-HERE” }); Inside your custom page, you can use this record to dynamically load content or drive logic — for example, prefiltering data, showing a user profile, or editing a configuration.

